Friday, 17 February 2017

Dirty output jack


The season is changing, old guitars are coming out of cupboards, humidity is rising and jack socket are oxidising.
 It's pretty simple really, if you've got a crackly jack it may just need cleaning.

Incidentally, it's an "output" jack, not an "input" jack - just a pet hate of mine.

You can see the jack in this Les Paul is looking a tad fluffy. This one isn't very bad but it's worth a clean anyway as part of a set up.


I use 600 grade wet'n'dry paper used dry.


I simply tear a piece off, roll it up and clean the jack out with it. A squirt with some contact cleaner can help. It's good to keep a piece in your guitar case in case your jack goes crackly at a gig.


 You can see a fair bit of dirt can come off even this relatively clean jack. Just think what that was doing to your earth connection.


If a jack is really bad and the customer is gigging I usually just replace it. It doesn't cost much and it's something you just can't do without.
   Cheers
       Glyn


 ………………………………………………………………………………………….

I am no longer repairing guitars - I now work full time making pickups


Tuesday, 29 November 2016

Electric guitar set up

I thought I'd show you exactly what's involved in a typical electric guitar set up at my workshop.
There are plenty of places that advertise set ups but all that they really do is adjust the bridge and maybe the truss rod. A lot of those customers end up coming to me after all.

 For me, the very first part of a set up is talking to the player, I need to find out what they want to change, what they want to keep, their approach to playing, string gauge and tuning. A set up is a personal thing.

 Each guitar requires a different approach, this is just a typical example.
 So what do you get for your money?
 Take a look at this:

https://youtu.be/P4skoNpZe24


Thanks so much to The Bull Kelp Surfers for the cool soundtrack www.bullkelpsurfers.co.nz and to Mal at Oracle for putting it all together.

 Glyn


 ………………………………………………………………………………………….

I am no longer repairing guitars - since covid 19 I now work full time making pickups


Thursday, 27 October 2016

Treble bleed capacitors


You may have noticed that when you turn the volume control down on an electric guitar it not only gets quieter but also more muddy. As the volume goes down so does the clarity. This can, of course, be useful. Quite often you'll want to be able to take some sparkle off the sound of single coil pickups. But with humbuckers I think they just get too wooly and undefined as the volume goes down.
So here's the solution, it's cheap and simple, easy to fit and makes humbuckers so much more versatile without taking anything away from the full volume sound. I'm talking about treble bleed capacitors.
 For our purposes all you need to know about capacitors (caps for short) is they allow treble frequencies to pass through them but block bass. The frequencies involved depend on the value of the cap.
 The volume control (potentiometer or pot) on an electric guitar looks like this:


It's a fairly simple device, As you turn the volume down the resistance between the 'in' and 'out' leg increases. This makes it increasingly harder for the signal from your pickups to get through. Less signal means quieter.
 Here's the same thing with our cunning treble bleed:


This one has the 'Orange Drop' treble bleed which has a resistor added to it. This resistor softens the treble as you turn down making the effect more subtle. My preference is for the cap on its own.
So as you turn down and the the resistance increases there's an alternative path for the signal  - through the cap. But the cap will only let treble through. As you turn the volume down you're also turning the bass down. As a result you have a usable single coil (ish) sound when the volume is low. If you're overdriving an amp the result is cleaning your sound up. So with a high gain amp and your volume at about 1/4 you get a bluesy breaking up sound , crank the volume on the guitar and you're rocking.
Here's a picture of me rocking.


 As you can see, it's very effective.
On my guitars I prefer a simple treble bleed (0.001uf), no coil taps or series parallel. Just the volume control.


 ………………………………………………………………………………………….

I am no longer repairing guitars - since covid 19 I now work full time making pickups


Tuesday, 20 September 2016

Stratocaster Pickup re-wind.


A customer brought me a 'dead' Strat style pickup the other day. It's out of an 80's Yamaha but its identical to a Fender in design.


Mr Glyns Pickups

I see quite a few old Fender pickups that have suddenly started to sound thin and quiet. It's a common problem, the insulation breaks down over time shorting out the pickup. 

The fate of this pickup was sealed when it's owner decided to adjust the pole piece height. It has the vintage style staggered poles, they are not adjustable, if you push them in it will sheer of a load of wires and kill the pickup. 


Strat Pickup Mr Glyns Pickups

I like pickups, I like rewinding them. It's such simple high school physics but so fundamental to electric guitars.
 A pickup is simply a magnet with a coil of very thin wire wrapped around it. If you pass something ferrous through the magnetic field (a vibrating string) it disturbs the field causing electrons in the coil to move - that' electricity. It's not much electricity but amplify it a couple of times and you've got stadium ROCK. Cool eh.
To make a pickup sound good is rather more complicated, in fact, rather surprisingly so considering the basic principle is straight forward.

I tested the pickup and the meter showed it was dead. Before snipping all the windings off I just re-solder the wire terminals just in case of dry joints, this does sometimes fix it , worth a go.


Mr Glyns Pickups


In order to re-wind it I need to cut off the old windings. The wire is as fine as hair (I'm judging by my own) and there are thousands of turns of it. I'm careful not to damage the bobbin while doing this. Any little nicks can catch on the new windings and ruin an otherwise good rewind.


Mr Glyns Pickups


Mr Glyns Pickups

The old windings are off now and you can see what happened.
The two highest pole pieces that were pushed down have torn the protective tape and sneered off some of the turns.


Mr Glyns Pickups

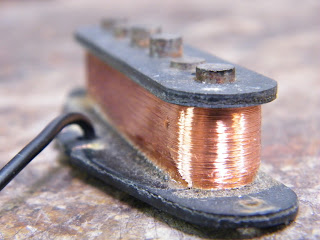
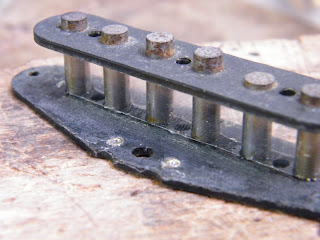
You can see what a simple structure a Fender pickup is. Each of the 6 lugs is an alnico magnet press fitted into vulcanised fibre board. I use a blade to scrape off any excess wax and smooth out any high points.

Mr Glyns Pickups

 I seep very thin superglue into the magnet/fibreboard joints just to be sure it's all still strong.

Mr Glyns Pickups

I replace the tape with some thinner stuff. The tape increases the life of a pickup by preventing the inner windings from shorting out on the pole piece. I use really thin tape to keep the inner windings as close as possible to the magnet. There's a lot of high end clarity that comes from these inner windings. This pickup is ready for the winding machine.

Mr Glyns Pickups


Mr Glyns Pickups - winding machine

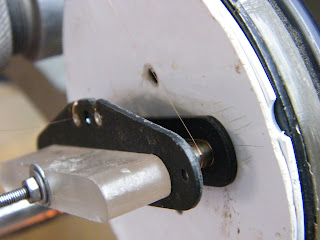
I mount the pickup to the machine with an extra little block to keep the underside straight. Some vintage pickups can get a bit bendy without this support when winding.

Mr Glyns Pickups

I anchor the wire by wrapping it through the lug 4 or 5 times.


Mr Glyns Pickups

 I prefer to wind with a combination of scatter winding by hand and machine winding. I've tried so many different ways over the last 20 years, this works best for me.
Here's the finished coil. You can see it looks slightly uneven, that's intentional. If you wind a pickup too neatly it sounds a bit dull. An element of randomness creates a loose, open clarity. 

Mr Glyns Pickups coil winding

I've wound this one with 8500 turns of 42AWG wire. It's come out at 6.2 KOhms which was about what I wanted. This is a bridge pickup and the other two are 5.6KOhms wound with the same gauge wire. So it should match in well.

I wax pot it to prevent micro phonic feedback

Mr Glyns Pickups pickups potting

 And we're done - this Strat pickup lives to ROCK another day

Mr Glyns Pickups Strat re-wind

 ………………………………………………………………………………………….

Feel free to contact me, mrglynspickps@gmail.com


Monday, 7 March 2016

10 String Lap Steel


Towards the end of last year I got a call asking if I could make a 10 string lap steel guitar. Why not I thought.

 In their simplest form lap steels are very simple.

https://www.youtube.com/watch?v=yZ7DZ7HPXck

 I wanted to be a tad more sophisticated with mine. This might be a simple instrument but the components and construction still make a difference to the sound. It's a fretless electric guitar with a high action - the wood, bridge, nut and electronics are just as important as for a LesPaul or Stratocaster. Well that's how I look at it anyway.
 I decided to design it with a cool old traditional vibe - Empire State meets LeMans which sounds like I'm mixing my decades but there's a boldness of line in common that I like.


 I combined 2 woods, Paulownia and Australian Blackwood.
 I wanted a hard wood (Blackwood) to both emphasize the high frequencies and help transmit vibrations along the instrument and help it sustain. It gives it structural strength too.
 The soft Paulownia is great for lower frequencies, warms up the bass and mids and adds an almost reverb like quality to the note.
 Blackwood on its own would make a harsh sounding heavy instrument with too much treble, Paulownia on its own, wooly and undefined without enough structural strength. But together, they really work.
 They give a nice colour contrast too with the darker stripes running right through the instrument.
 For the fingerboard I chose a piece of Swamp Kauri (https://en.wikipedia.org/wiki/Swamp_kauri). This is one of the oldest workable timbers in the world. I don't know how old this piece is, I'd need to get it carbon dated, lets just say a few thousand years. It's frequencies lie between the other two woods and it's a beautiful colour. It gives the player something pretty to look at. We're lucky here in NZ to have some fantastic timbers. I inlayed fret markers and some chequered stripes into it.


I chose aluminium for bridge and nut, it has a lively, quick response. Steel feels like it reacts slower. I think that extra mass just takes more string energy to get it moving. I used long screws to mount the bridge deep into the wood - that coupling is important.
 I made the P90 style pickup from scratch using alnicoII magnets and fibre board. I wound it as I would a conventional P90, ties the ends off and then wound a couple of thousand extra turns of thin wire on top.
Using a switch the extra turns can be added. So it can go from a traditional chiming pure sound to a grunty, dirty powerful blues tone at the flick of a switch - two pickups in one.
 I got the pickup cover 3D printed, remember this is a 10 string, parts just aren't available.


  I had the decals made up in a groovy font - I usually inlay my guitars but the decal suited this one better.


 I finished it in shellac so as not to stifle any of the sound I'd worked hard to achieve.There's no point in making a light, resonant instrument and then stifling it with thick polyurethane just for the sake of ease.

 By now I'd gone way over the usual spec for a lap steel (I just can't help myself) but I do think it's an instrument that needs to be taken more seriously.
 I'd come in exactly on budget but a week over time.

He seemed pretty happy with the end result.


 ………………………………………………………………………………………….

I am no longer repairing guitars - since covid 19 I now work full time making pickups


Wednesday, 3 June 2015

Multiscale Guitars - what's it all about?


Recently I've been making a few acoustic guitars. Some have been custom orders and some to have at the workshop for sale.
But until now I haven't made a multiscale guitar. I've been interested in multiscale guitars for a while but have never played one. I find the idea of them very appealing so I just had to try one out.


 As you can see the frets, nut and bridge are not parallel.
The idea behind it is so much more than a gimmick - there's a lot of sense in it.
It's all about scale length - the distance between nut and bridge.
Scale length plays a huge part in the tone of the guitar. To put it in electric guitar terms - ever wondered why a Strat and a Les Paul sound and feel so different? One of the main factors is scale length.

 A Strat has a longer scale length than a Les Paul (25.5 inch to 24.75inch). To tune a longer string to the same pitch it needs to be tighter. So a Strat has more string tension than a Les Paul for the same gauge strings in the same tuning.
 The result is, the bass strings of a Strat have a lovely chime where as the Les Paul bass strings can be a bit woolly (especially when tuned down).
 But the more taught treble strings of a Strat can be a bit pingy where as the Les Paul treble strings really sing.
 So it makes sense to build guitars with a combination of scales. PRS use a 25 inch scale length to try and get the best from both. But that doesn't solve the problem, it just compromises on both bass and treble.
I decided to build this guitar with a 25.625 bass string and a 24.75 treble with the scales converging at 12th fret.

 It's not a new idea - not at all, it's been around since the 16th century.

The guitar is constructed slightly differently to allow for the different scales. I've off set the internal braces and bridge plate.


 I carved the braces to free up the bass side and help the treble project.


The body is of Australian Blackwood,Cedar top and Mahogany neck with a traditional tapered dovetail neck/body joint. The headstock has been modified to accommodate the angled nut.


I use the traditional tapered dovetail neck/body joint.


And does it work? Well, ... yes.

I'm delighted with the result. The bass is clear, the treble is punchy but warm, there's a well balanced mid range.
 Having each strings at its ideal tension means it intonates superbly. - I'm chuffed.

From a players perspective - how does it feel? I imagined it would take a bit of getting used to, but not so. The biggest surprise has been how easy and natural it is to play.
 So far a few people have played it and they've all found it feels natural.
Dylan Kay (http://www.aucklandguitarschool.co.nz/) popped in the other day and he loved it.


This guitar is residing at my workshop (until someone buys it) - pop in for a play. And of course if you'd like a custom made guitar... (especially a multiscale)
 Cheers
    Glyn


 ………………………………………………………………………………………….

I am no longer repairing guitars - since covid 19 I now work full time making pickups


Saturday, 7 March 2015

Guitar Tuners


Guitar tuners are a fantastic tool. There are lots of them out there, these are just the ones I use.

For a handy (and surprisingly accurate), go anywhere tuner I use the PitchLab (free) app on my phone. Microphones on phones are great at filtering out unwanted background noise and this tuner is simple to use and has a great display (as well as other stuff you don't need). I find I use it all the time - tuning a ukulele at home, a guitar at a mate's house, wondering what pitch the chickens squawk at...


On stage I use the old faithful Boss TU-2. It's robust, the lights are bright, it's accurate enough and doesn't flicker about or give false readings. It's hard to fault the TU-2 for live use.

Boss TU-2

My workshop tuner, however, needs to be the best I can get. My own pitch hearing is pretty average but some of my customers are very sensitive to pitch.
 My workshop tuner needs to be better than my most sensitive customer. So I use the Peterson Strobosoft.
 I have a computer under the workbench solely dedicated to running the tuner. I run all the cables under the workbench so there's less in the way.
 It's a fantastic system, a bit much for the most players but in my situation it is unbeatable. You can get Peterson tuners in NZ from www.heywiremusic.com


 I just plug a short cable into the edge of the bench - the switch gives me tuner/amp/both. This minimises the amount of wire to get tangled.


Cheers
     Glyn


 ………………………………………………………………………………………….
I am no longer repairing guitars - since covid 19 I now work full time making pickups